2011|08|
2013|10|11|12|
2014|01|02|03|04|05|06|07|08|09|10|11|12|
2015|01|02|03|05|06|07|08|09|10|11|12|
2016|01|03|04|05|06|07|08|09|10|11|12|
2017|01|02|03|04|05|06|07|08|09|10|11|12|
2018|01|02|03|04|05|06|07|08|09|10|11|12|
2019|01|02|03|04|05|06|07|08|09|10|11|12|
2020|01|02|03|04|

2019-02-02 AG-デスクトップレコーダで、4秒(数秒)しか録画できない(のが直った)件 [長年日記]

AG-デスクトップレコーダで、4秒(数秒)しか録画できない(のが直った)件

AG-デスクトップレコーダで、4秒(数秒)しか録画できない(のが直った)件

  • 記載日
    • 2019/02/02
  • 1.背景
    • ■AmuseGraphics のライセンスを購入したが、4秒(数秒)しか録画できず、困っていた
    • ■そこで、作者の方に連絡を取って、アドバイスを頂くことにした
  • 2.江端から作者様へ送付したメールの概要
    • ■はじめまして。江端智一と申します。
    • ■以前より、 AGDRec64.exeを愛用させて頂いております。
    • ■この度、ライセンス切れであるとの表示が出たため、以前のファイルを全部抹消した上で、AG_140.zipをダウンロードしてインスートルした後、ライセンスキーも購入し、設定致しました。
    • ■ところが、制限制約をしていないのに、どうしても4秒以上の録画ができず大変困っています。
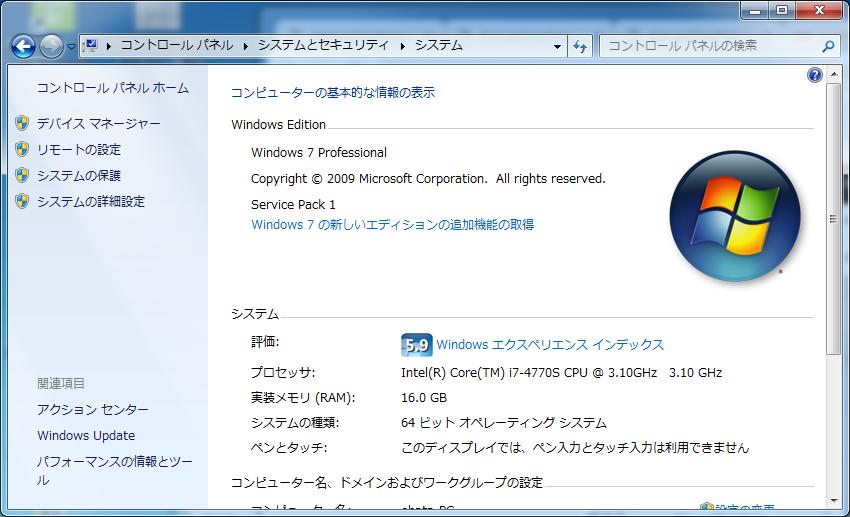
    • ■当方のPCのスペックは以下の通りです
    • ■何卒よろしくお願い申し上げます。
  • 3.作者様から江端に頂いたメールの概要
    • ■問題の把握
      • 「録画開始から4秒後に自動的に録画が終了してしまう」という仮説にて、以下御説明致します。
    • ■状況分析1
      • ■添付されたmp4ファイルは、最後がおかしくなっている様に見えますが、とりあえず再生は出来ていますで、AG-デスクトップレコーダーとしては、正常に録画終了しているのかもしれません。
      • ■そうなる理由としては、制限設定が誤って働いているか、録画制御キーか、Ver1.4.0で追加したプレビューダイアログで、録画終了が指示された、という可能性が考えられます。
    • ■対応1 \AmuseGraphicsの削除
      • ■AmuseGraphicsはドキュメントフォルダーにあるAmuseGraphicsというフォルダーに設定ファイルを保存しています。このため、古い設定が残っていて問題が出ている可能性も考えられますので、もしドキュメント\AmuseGraphicsを残されていた場合には、このフォルダーを削除してから、再度、AmuseGraphicsでレジストキーを登録してみて下さい。

    • ■対応2 録画制御キーの設定
      • ■制限設定については、前述のAmuseGraphicsフォルダーの削除で、問題があった場合にも問題は無くなると思われます。制御キーについては、設定ダイアログの「録画制御キー設定」で、「F12」となっている所を「無効」に変更すれば、他ソフトやキーボードの異常動作により、録画制御キーが押された状態になっても録画が終了する事を防げます。

    • ■対応3 録画ログによる確認
      • ■プレビューダイアログについては、AGアイコンをクリックして表示し、「設定変更」から、「ピン止め」を選択し、再度AGアイコンをクリックし、表示させた状態で、このダイアログにある「録画開始」ボタンを押し、「録画開始」から「録画終了」に変わった後、勝手に「録画開始」に戻っているかどうかを確認すれば、何かしらの問題が発生しているかどうかのヒントは得られるかもしれません。

    • ■対応4 H.246コーデックや録音デバイズの設定
      • ■なお、H.246コーデックや録音デバイズ絡みの問題も想定されますので、上記の確認を行っても状態に変化がない場合には、コーデック設定を「AmuseGraphics Movie (AGM形式)」、オーディオ設定を「使用しない」に変更しても、やはり4秒しか録画できないかどうかを確認してみて下さい。

  • 4.江端から作者様へ送付したメールの概要(その2)
    • ■サポート頂きありがとうございました。
      • ■ご指導の内容を実施して、mp4の録画ができるようになりました。
      • ■今後のユーザの皆様へのアドバイスにお役に立ちますよう、概要を記載させて頂きます。
    • ■江端の実施事項概要
      • ■(Step 1)¥AmuseGraphicsを削除した後、アンインストールを実施し、再度インストールを実施し、ライセンスキーを投入致しました。
      • ■(Step 2)この後、mp4での録画を試みたのですが、4秒録画から改善は見られませんでした。ログを見たところ、8割がたのフレームがDropしていることが分かりました。
      • ■(Step 3)そこで、御指示の通り、(a)F12の無効、(b)AGM形式にして、(c)オーディオ設定にしない、として、さらにプレビューは「ピン止め」としました。
      • # 個人的な所感なのですが、この、「一回、AGM形式で録画してみる」が重要な感じがしています。
      • ■(Step 4)AGM形式のファイルは、AmuseGraphics(x64)にドラッグすれば再生できることを確認しました。
      • ■(Step 5)ここで再び、(a)F12の無効、(c)オーディオ設定にしない、を保持したまま、MP4形式としたのですが、FPSは"15"に落しました。
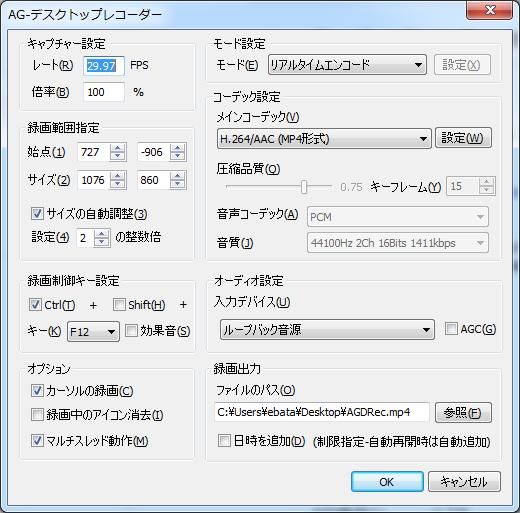
      • ■(6)これによって、録画できるようになりました。ログの内容は以下の通りです
        • **************************************************
        • * AG-Desktop Recorder (Realtime MP4 Encode Mode) *
        • **************************************************
        • - Setup Info -
        • Multi Thread   : Yes
        • Capture Size   : 1280 x 1024
        • Output Size    : 1280 x 1024
        • Req Frame Rate : 15.00 FPS
        • Video Profile  : Baseline
        • Video Quality  : 90
        • HW Encode      : Disable
        • Audio Capture  : No
        • - Capture Info -
        • Capture Time   : 36.2 Sec
        • Capture Frame  : 543 Frame
        • Drop Frame     : 0 Frame
        • Frame Rate     : 15.01 FPS
        • - Performance Info -
        • File Size      : 7 MB (0.2MB/Sec)
        • BitBlt Time    : Mean 38mSec Max 78mSec
        • Encode Time    : Mean 4mSec Max 11mSec
    • ■江端所感
      • ■根拠はないのですが、「一回AGM形式を試してみる」「音も制御も落す」とした後、「MP4の場合は、レートを落してみる」としてみるのが大切なような気がしました。
      • ■あと、本ソフトの「プレビュー画面」は偉大です。これは、素晴しくhelpfulです。レビューしてみるまで画像が分かるのは非常に便利です。
  • 5.作者様から江端に頂いたメールの概要(その2)
    • ■今回の問題の仮説の修正
      • ■とりあえず、問題が解決されたとのことで、当方としても一安心です。
      • ■今回の問題は、「過負荷のエンコードを強制された結果、最初の4秒分しか正しくファイル出力できなかった」と問題の仮説を修正しました
        • →上記3.の「録画開始から4秒後に自動的に録画が終了してしまう問題」の仮説から修正
    • ■Windows7の場合
      • ■デフォルトではAeroがOnになっていますので、キャプチャー可能なフレームレートは最大15FPS程度にしかなりません。

        ■この様な状態で高フレームレートでの録画を試みますと、処理負荷が高くなり、特にH.264でのエンコードには悪影響を及ぼす可能性があるのかもしれません。

        ■Windows7での高フレームレートでの録画用には「Aero停止」機能を提供しています。

        ■Aeroを停止すると、半透明のAeroグラス表示が行われなくなりますので、ソフト動作のデモ用にキャプチャーする場合等には相応しくは無くなりますが、キャプチャー可能なフレームレートは60FPS程度まで向上します。

    • ■高フレームレートでのリアルタイムエンコードの問題点
      • ■ただし、問題の本質が、H.264エンコーダーが高フレームレートでのリアルタイムエンコードに耐えられない、ということであった場合には、Aeroを停止してキャプチャーレートを上げると、更に酷い状況になる可能性も考えられます。

    • ■本ソフトウェアの強み(AGM形式用のエンコーダー)
      • ■その様な場合にも、AGM形式用のエンコーダーは、当方が開発しており、通常は、60FPSのリアルタイム録画でも、CPU性能に応じたエンコードを行う様にしています。

        ■リアルタイムのH.264エンコードが上手く行かない場合には、録画はAGM形式で行い、AGM形式の録画ファイルが出来上がった後、AGMPlayer/AG-ムービーカッターで、それをmp4(H.264)形式に再エンコードする、という手もあります。

        ■この場合には、H.264エンコーダーでも、時間をかけて無理のないエンコードが行われますので、リアルタイム録画では問題が発生する場合にも、問題が発生しなくなる可能性は高くなります。時間がある時にでもお試し下さい。

  • 以上

2019-02-03 udp-client-loop.py [長年日記]

#coding: UTF-8
 
import socket
from time import sleep
 
client = socket.socket(socket.AF_INET, socket.SOCK_DGRAM)
# client.bind(("127.0.0.1",2000))
 
# client.sendto(b"12345",("127.0.0.1",2000))
 
for i in range (10):
    sleep(1)
 
    lat_train1 = 35.898216 - 0.005 * i
    lon_train1 = 139.910479 + 0.005 * i
 
    # client.sendto(b"train1,35.898216,139.910479\n",("127.0.0.1",2000))
 
    chr_train1 = "train1,"+ str(lat_train1) + "," + str(lon_train1) + "\n"
    print chr_train1
    client.sendto(chr_train1,("127.0.0.1",2000))
 
    sleep(1)
 
    lat_person1 = 35.848216 + 0.005 * i
    lon_person1 = 139.910479 + 0.005 * i
 
    # client.sendto(b"train1,35.898216,139.910479\n",("127.0.0.1",2000))
 
    chr_person1 = "person1,"+ str(lat_person1) + "," + str(lon_person1) + "\n"
    print chr_person1
    client.sendto(chr_person1,("127.0.0.1",2000))
syntax2html

2019-02-04 Test_of_PosiView_test2.mp4 [長年日記]


2019-02-06 QGISのプラグイン(PosiView)を使って、移動体のリアルタイム表示をする [長年日記]

QGISのプラグイン(PosiView)を使って、移動体のリアルタイム表示をする (display real-time mobile objects using QGIS plug-in (PosiView) )

QGISのプラグイン(PosiView)を使って、移動体のリアルタイム表示をする
(display real-time mobile objects using QGIS plug-in (PosiView) )

  • Date

    • 2019/02/06

    Data

    1.背景(Background)

    • ■最近QGISを頻繁に使うようになった
      (Recently I have used QGIS frequently)

      ■「QGISで交通シミュレーションのビューアが作れたら、楽できるんだけどなー」とか考えるようになってきた
      (I came to think that "if I can make a traffic simulation viewer with QGIS, it is easy")

      ■QGISのプラグインを探していたら、"PosiView"が使えそうなことが判ってきた
      (When I was looking for a plugin for QGIS, I found out that "PosiView" might be useful)

    2. What's "PosiView"

    • ■複数のオブジェクトや車両を追跡し、それらをキャンバス上の形状や点として表示することができるQGISのプラグイン
      (PosiView tracks multiple mobile objects and vehicles and displays their position on the canvas)

      • ■GPS、USBLシステムまたは他のセンサーのような装置から通常NMEA-0183フォーマット等で提供される位置データを受けつける
        (The Plugin reads usually NMEA formatted data from USBL or other navigation devices and displays the object as scaled symbol on the canvas.)

        ■これらのデバイスへの接続は、TCP/UDPによって行うことができる
        (Connection to those devices is established by data provider connecting to network sockets (UDP/TCP))

      ~ https://plugins.qgis.org/plugins/PosiView/

      ~ https://github.com/jrenken/qgis-PosiView/blob/master/help/source/index.rst

    3. 問題点(Problem)

    • ■私は、シミュレータから出力される位置情報をリアルタイムで表示したかった
      (I wanted to just display the position information of realtime simulator)

      • ■ところが、PosiViewには、このような低機能なパーサーが実装されていなかった
        (However, PosiView did not have such a low function parser)

    4.対応

    • ■"PosiView"の作者である、イェンス・レンケンさん(Mr.Jens Renken)にメールでご相談してみた
      (I asked Mr. Jens Renken, author of "PosiView", for help with e-mail)

      • ■新しいパーサーを追加して頂いた(Mr. Jens Renken was kind enough to make a new parser and add it)

    5.設定例(Setting example)

    • 以下、実際に動かした例をそのまま表記する
      (The following is a example actually moved )
    • A.準備編(Preparation)
      • (Step 1) postGISに"k11.osm"をインポートしておく
        (Import "k11.osm" into postGIS)

        (Step 2)プラグインPosiViewをインストールする
        (Install plug-in PosiView)

        • QGIS→プラグイン→プラグインの管理とインストール→全て→検索欄に"posiview"と入力→posiviewを選択→プラグインをインストール
          (QGIS → Plugins → Manage and install plugins → All → Enter "posiview" in the search field → select posiview → Install plugin)

        (Step 3)

        • ~ https://cloud.marum.de/s/tp2D2s5poPE3doS
        • ■から、"PosiView_custom_parser_2.zip"をダウンロードして解凍
          (Download "PosiView_custom_parser_2.zip")
        • ■解凍したものを
          (unziped files)

          • ■QGIS2の場合は
            (In case QGIS2)

            • C:\Users\(username)\.qgis2\python\plugins\PosiView\dataprovider\dataparser
          • ■QGIS3の場合は
            (In case QGIS3)

            • C:\Users\(username)\AppData\Roaming\QGIS\QGIS3\profiles\default\python\plugins\PosiView\dataprovider\dataparser

        • ■にある、

          • ■"__init__.py" を上書きして
            (Overwrite "__init__.py")

            ■"parser_test.py" を追加する
            (Add "parser_test.py")

        (Step 4)

        • ■QGISを再起動する(Restart QGIS)

        (Step 5)データ送信用のテストプログラムをダウンロードする
        (Download test program for data transmission)

    • B.設定編(Setting)
      • ■を選んで、"Enable posiview"を選択
        (Choose "Enable Posivew")

        ■再度、プラグイン→"PosiView"→"Configure PosiView"を選択
        (Again, select plugin → "PosiView" → "Configure PosiView")

    • C.実行編(Execution)
      • ■プラグイン→"PosiView"→"start/stop tracking"を選択
        (Plug-in → "PosiView" → select "start / stop tracking")

        ■コマンドプロンプトから ">python2 udp-client-loop.py" を投入
        (From the command prompt, enter "> python 2 udp - client - loop.py")

    6. 実行結果(動画)
    (Execution result (movie))


2019-02-10 削除 URL Google [長年日記]

削除 URL Google

https://www.google.com/webmasters/tools/url-removal


2019-02-17 How to display more than 10 objects by PoviView [長年日記]

Dear Mr.

Thank to your  quick advice. Now I can make 30 objects at the same time.

http://www.kobore.net/30objects.mp4

http://www.kobore.net/udp-client-loop100.py

By the way, I tired to your two files  https://cloud.marum.de/s/nXmbJipEeSqXSBd. Unfortunately "tracking_dock.py" seems not to work well in QGIS 2.18.28


The message is "Python error: Could not load PosiView plugin Error encountered calling classFactory () method See message log (Python error) for details"

However, the old "tracking_dock.py" looks like work. And I will try the new "tracking_dock.py" on QGIS3, too next week.

>I'm curious about the performance of the plugin when dealing with hundreds of objects.  
I am going to confirm whether PosiView can make "4770 persons objects" move at this weekend.
I would appreciate if I could get your cooperation on this trial.  

Best regards, 
Tomoichi Ebata

_ Dear Mr. Tomoichi Ebata,


there is no explicit limitation of the number of objects. But in your test10.ini the index of objects runs from 1 to 9 which results in an array size of 9.

Mobiles\size=10  is the wrong value. It has to be: Mobiles\size=9. Mobiles\size must not be greater the the largest index and the number of Mobiles entries.
The only problem that could arise when you have hundred objects is the limited size of the tracking window. I made a quick fix for that: the object displays are now placed  in a scroll area. Just replace the two files https://cloud.marum.de/s/nXmbJipEeSqXSBd  in the plugin directory.

I'm curious about the performance of the plugin when dealing with hundreds of objects.

Best regards


Am 07.02.19 um 05:21 schrieb 江端智一:
Dear Mr.

I are very sorry for the frequent request.
Now I am trying to show about  on hundred object at the same time by PosiView.

Now I edit "test10.ini" file in D:\Program Files\QGIS 3.4\bin (at my evvironment)

[PosiView]
Mobiles\1\Name=train1
Mobiles\1\timeout=10000
Mobiles\1\nofixNotify=10
Mobiles\1\enabled=True
Mobiles\1\provider={'UDPDataProvider': 'train1'}
Mobiles\1\type=X
Mobiles\1\size=16
Mobiles\1\length=0.01
Mobiles\1\width=0.01
Mobiles\1\offsetX=0.0
Mobiles\1\offsetY=0.0
Mobiles\1\shape="((0.0, -0.5), (0.3, 0.5), (0.0, 0.2), (-0.5, 0.5))"
Mobiles\1\color=4281573420
Mobiles\1\fillColor=4281573420
Mobiles\1\penWidth=5
Mobiles\1\trackLength=20
Mobiles\1\trackColor=4278190080
Mobiles\1\zValue=50.0
Mobiles\1\showLabel=True

Mobiles\2\Name=person2
Mobiles\2\timeout=9000
Mobiles\2\nofixNotify=8
Mobiles\2\enabled=True
Mobiles\2\provider={'UDPDataProvider': 'person2'}
Mobiles\2\type=CROSS
Mobiles\2\size=16
Mobiles\2\length=0.01
Mobiles\2\width=0.01
Mobiles\2\offsetX=0.0
Mobiles\2\offsetY=0.0
Mobiles\2\shape="((0.0, -0.5), (0.3, 0.5), (0.0, 0.2), (-0.5, 0.5))"
Mobiles\2\color=4294902017
Mobiles\2\fillColor=4294902017
Mobiles\2\penWidth=5
Mobiles\2\trackLength=0
Mobiles\2\trackColor=4278190080
Mobiles\2\zValue=100.0
Mobiles\2\showLabel=True

Mobiles\3\Name=person3
Mobiles\3\timeout=9000
Mobiles\3\nofixNotify=8
Mobiles\3\enabled=True
Mobiles\3\provider={'UDPDataProvider': 'person3'}
Mobiles\3\type=CROSS
Mobiles\3\size=16
Mobiles\3\length=0.01
Mobiles\3\width=0.01
Mobiles\3\offsetX=0.0
Mobiles\3\offsetY=0.0
Mobiles\3\shape="((0.0, -0.5), (0.3, 0.5), (0.0, 0.2), (-0.5, 0.5))"
Mobiles\3\color=4294902017
Mobiles\3\fillColor=4294902017
Mobiles\3\penWidth=5
Mobiles\3\trackLength=0
Mobiles\3\trackColor=4278190080
Mobiles\3\zValue=100.0
Mobiles\3\showLabel=True

......

Mobiles\9\Name=person9
Mobiles\9\timeout=9000
Mobiles\9\nofixNotify=8
Mobiles\9\enabled=True
Mobiles\9\provider={'UDPDataProvider': 'person9'}
Mobiles\9\type=CROSS
Mobiles\9\size=16
Mobiles\9\length=0.01
Mobiles\9\width=0.01
Mobiles\9\offsetX=0.0
Mobiles\9\offsetY=0.0
Mobiles\9\shape="((0.0, -0.5), (0.3, 0.5), (0.0, 0.2), (-0.5, 0.5))"
Mobiles\9\color=4294902017
Mobiles\9\fillColor=4294902017
Mobiles\9\penWidth=5
Mobiles\9\trackLength=0
Mobiles\9\trackColor=4278190080
Mobiles\9\zValue=100.0
Mobiles\9\showLabel=True

Mobiles\size=10

DataProvider\1\Name=UDPDataProvider
DataProvider\1\DataDeviceType=UDP
DataProvider\1\Host=127.0.0.1
DataProvider\1\Port=2000
DataProvider\1\Parser=TEST
DataProvider\size=1
Mission\Cruise=CruiseXX
Mission\Dive=DiveX
Mission\Station=#xxx
Recorder\Path=C:\\Users\\ebata
Recorder\AutoRecord=false
Misc\NotifyDuration=0
Misc\ShowUtcClock=false
Misc\DefaultFormat=5

I  could confirm that the above "ini" file worled well. however, 
Mobiles\size=11 (or more) 
It didn't work. with the following message.
(To tell you the truth, I have already made a ini file for "100 persons")
  
image.png
Pythonコードの実行中にエラーが発生しました: 

KeyError: 'Name' 

Traceback (most recent call last):
  File "C:/Users/ebata/AppData/Roaming/QGIS/QGIS3\profiles\default/python/plugins\PosiView\gui\posiview_properties.py", line 111, in onActionLoadConfigurationTriggered
    self.projectProperties = self.project.read(fn)
  File "C:/Users/ebata/AppData/Roaming/QGIS/QGIS3\profiles\default/python/plugins\PosiView\posiview_project.py", line 160, in read
    properties['Mobiles'][mobile['Name']] = mobile
KeyError: 'Name'
Pythonバージョン: 3.7.0 (v3.7.0:1bf9cc5093, Jun 27 2018, 04:59:51) [MSC v.1914 64 bit (AMD64)] 
QGISバージョン: 3.4.3-Madeira Madeira, 2f64a3c4e7 


I thought that Posiview has an upper limitation number of object for "PosiView tracking display". 

I tried to search the "upper limitation number" in python codes, but I could not find it.
If you know how to resolve this problem,  I would appreciate receiving your advice.

Best regards,
Tomoichi Ebata

2019-02-18 STLのリストの使い方(ファンクションへのリストの渡し方とか、リストの複製の作り方とか) [長年日記]

/*
  g++ -g wf.cpp -o wf
 
  ワーシャル-フロイド法
  (ダイクストラは個別ルートでは早いが、先に全ルート計算しておくなら、
  こっちの方法の法が速いこともある)
  
  と、
 
  STLのリストの使い方(ファンクションへのリストの渡し方とか、リストの複製の作り方とか)
  などの、便利な技が仕込まれているので貼っておく


*/
 
#include <stdio.h>
#include <stdlib.h>
#include <iostream>
#include <list>   // list 利用のため
 
using namespace std;
 
//int d[100][100];  // d[i][k]:ノードiからノードkへの距離 
//int via[100][100];  // d[i][k]の間にある(少くとも1つの)中継ノード
 
double d[100][100];  // d[i][k]:ノードiからノードkへの距離 
int via[100][100];  //  d[i][k]の間にある(少くとも1つの)中継ノード
 
list<int> path[100][100];   // int 型の list を宣言  
 
 
#if 1
// 中継パスの表示ルーチン(再帰呼出し用)
void printPath1_aux(int begin, int end) {
  if (via[begin][end] == begin) {
	if (begin != end)
	  printf("%02d -> ", begin);
	return;
  }
  
  printPath1_aux(begin, via[begin][end]);
  printPath1_aux(via[begin][end], end);
}
#endif
 
// 中継パスの表示ルーチン(再帰呼出し用)
void printPath1_aux(int begin, int end, list<int>* p) {
  if (via[begin][end] == begin) {
	if (begin != end){
	  // printf("%02d -> ", begin);
	  p->push_back(begin);
	}
	return;
  }
  
  printPath1_aux(begin, via[begin][end], p);
  printPath1_aux(via[begin][end], end, p);
}


// 中継パスの表示ルーチン
#if 1
void printPath1(int start, int goal) {
  printPath1_aux(start, via[start][goal]);
  printPath1_aux(via[start][goal], goal);
  printf("%02d\n", goal);
}
#endif 
 
void printPath1(int start, int goal, list<int> *p ) {
  printPath1_aux(start, via[start][goal], p);
  printPath1_aux(via[start][goal], goal, p);
  // printf("%02d\n", goal);
  p->push_back(goal);
 
}
 
 
int main(void)
{
  // 変数の初期化
  for(int i = 0; i < 100; i++){
	for(int j = 0; j < 100; j++){
	  d[i][j] = 999.9; // 距離の初期化(でっかい値を入力しておく(INT_MAXは足し算の時に桁上がりが起こるので使わない)
	  via[i][j] = i; // ノードiからノードkへの経由値の初期化 
	}
  }
 
 #if 0
  // 確認用の表示
  printf("\n[STEP1]\n");
 
  for(int i = 0; i < 100; i++){
	for(int k = 0; k < 100; k++){
	  printf("d[%d][%d]):%f\t",i,k,d[i][k]);
	  printf("via[%d][%d]):%d\n",i,k,via[i][k]);
	}
  }
#endif
 
  //// ここからは実際の距離を手書き
 
  for(int i = 0; i < 100; i++){
	d[i][i] = 0; //// 同じノードへの距離は0になるので、上書き
  }
 
  //ノード番号の通番を以下のようにする
  // [0][2] → "02", [4][9] → "49", [9][[9] → "99"
  // 座標は1ケタ内に留める
 
  for (int y = 0; y < 5; y++){
	for (int x = 0; x < 9; x++){
 
	  int n_num = x * 10 + y;
 
	  // + ( 1, 0)
	  int x_new = x + 1;
	  int y_new = y;
 
	  if (x_new < 9){
		int n_num_next = x_new * 10 + y_new;
		d[n_num][n_num_next] = 0.25;
		
		printf("1:d[%02d][%02d]=%f\n",n_num, n_num_next, d[n_num][n_num_next]);
 
	  }
 
	  // + (-1, 0)
	  x_new = x - 1;
	  y_new = y;
 
	  if (x_new > -1 ){
		int n_num_next = x_new * 10 + y_new;
		d[n_num][n_num_next] = 0.25;
		printf("2:d[%02d][%02d]=%f\n",n_num, n_num_next, d[n_num][n_num_next]);
	  }
 
	  // + ( 0, 1)
	  x_new = x;
	  y_new = y + 1;
 
	  if (y_new < 5 ){
		int n_num_next = x_new * 10 + y_new;
		d[n_num][n_num_next] = 0.25;
		printf("3:d[%02d][%02d]=%f\n",n_num, n_num_next, d[n_num][n_num_next]);
	  }
 
	  // + ( 0,-1)
	  x_new = x;
	  y_new = y - 1;
 
	  if (y_new > -1 ){
		int n_num_next = x_new * 10 + y_new;
		d[n_num][n_num_next] = 0.25;
		printf("4:d[%02d][%02d]=%f\n",n_num, n_num_next, d[n_num][n_num_next]);
	  }
	}
  }
 
  // 実験用上書き
  d[02][12] = 0.1;  
  d[12][22] = 0.1;  
  d[22][32] = 0.1;  
  d[32][42] = 0.1;  
  d[42][52] = 0.1;  
  d[52][62] = 0.1;  
  d[62][72] = 0.1;  
  d[72][82] = 0.1;  
 
  d[12][02] = 0.1;  
  d[22][12] = 0.1;  
  d[32][22] = 0.1;  
  d[42][32] = 0.1;  
  d[52][42] = 0.1;  
  d[62][52] = 0.1;  
  d[72][62] = 0.1;  
  d[82][72] = 0.1;  
 
 
#if 0
  // 確認用の表示
  printf("\n[STEP2]\n");
 
  for(int i = 0; i < 99; i++){
	for(int k = 0; k < 99; k++){
	  printf("d[%d][%d]):%f\t",i,k,d[i][k]);
	  printf("via[%d][%d]):%d\n",i,k,via[i][k]);
	}
  }
#endif
 
 
  // 経路長計算
  for (int k =0; k < 99; k++){  
	for (int i =0; i < 99; i++){
	  for(int j = 0; j < 99; j++){
		if(d[i][j] > d[i][k] + d[k][j]){
		  d[i][j] = d[i][k] + d[k][j];
		  via[i][j] = k; //更新処理
		}
	  }
	}
  }
 
 
#if 0
  // 計算結果
  printf("\n[STEP3]\n");
 
  for(int i = 0; i < 99; i++){
	for(int k = 0; k < 99; k++){
	  printf("d[%d][%d]):%f\t",i,k,d[i][k]);
	  printf("via[%d][%d]):%d\n",i,k,via[i][k]);
	}
  }
#endif 
 
#if 1
  // 経路パス表示
  printf("\n[Path]\n");
  for(int i = 0; i < 99; i++){
	for(int k = 0; k < 99; k++){
	  if (d[i][k] < 99.9){
		printf("d[%02d][%02d]:%f ",i,k,d[i][k]);
		printPath1(i, k);
		printPath1(i, k, &(path[i][k]));
	  }
	}
  }
#endif
  
  
  // イテレータ (反復子) の定義
  list<int>::iterator pos;
 
  list<int> l = path[83][04];
  // イテレータをずらしながら、全てのデータを取り出す。
  for(pos = l.begin(); pos!=l.end(); ++pos){
      cout << *pos << "\n";
  }
 
  printf("\n");
 
 
  // https://cpprefjp.github.io/reference/algorithm/copy.html
  // back_inserter を使って l2 へ設定。
  // back_inserter は要素をコピーするときに l2.push_back() するイテレータを作る関数。
  std::list<int> l2;
  std::copy(l.begin(), l.end(), back_inserter(l2));
 
  // l2.erase(v.begin() + 2);       //  3番目の要素(9)を削除
  l2.erase(l2.begin());       // 先頭の要素を削除
 
 
  for(pos = l2.begin(); pos!=l2.end(); ++pos){
      cout << *pos << "\n";
  }
 
 
}
syntax2html

2019-02-20 GDB プロンプトで条件付きブレークポイントを設定するには、以下のようにします。 [長年日記]

(gdb) br 8 if i == 8936
Breakpoint 1 at 0x80483f5: file iterations.c, line 8.
(gdb) r

出展:https://access.redhat.com/documentation/ja-jp/red_hat_enterprise_linux/6/html/developer_guide/gdbcondbreak


2019-02-21 STLについての自習 [長年日記]

push_back()によるクラスのリストが、実体を繋いでいるのか、コピーして繋いでいるのかの実験。

Newした以上DELETEが必要なのか、について調査中

/*
  g++ -g stl_test3.cpp -o stl_test3 -static-libstdc++ 
*/
 
#include <iostream>
#include <list>   // list 利用のため
using namespace std;
 
class PERSON
{
public:
  int age;
  int sex;
  int life; 
 
  PERSON(int _age, int _sex)
  {
	age = _age;
	sex = _sex;
	life = 1;
  }
 
  void func(void){
	age += 1;
  }
};
 
int main(){
 
  list<PERSON> person_list;
  
  PERSON *person1 = new PERSON(18, 0);
  PERSON *person2 = new PERSON(23, 1);
  PERSON *person3 = new PERSON(101, 1);
  PERSON *person4 = new PERSON(1, 1);
  PERSON *person5 = new PERSON(10, 10);
 
#if 0
  cout << "step1" << "\n";
  person3->life = -1; // 
  cout << person3->age << " " << person3->sex << " " << person3->life << "\n"; 
  cout << "\n";
#endif
 
  // どうやらpush_backはコピーするらしい
 
  person_list.push_back(*person1);
  person_list.push_back(*person2);
  person_list.push_back(*person3);
  person_list.push_back(*person4);
 
#if 1
  delete person1;
  delete person2;
  delete person3;
  delete person4;
  delete person5;
#endif
 
  cout << "step2" << "\n";
  list<PERSON>::iterator pos;
  for(pos = person_list.begin(); pos!=person_list.end(); ++pos){
	cout << pos->age << " " << pos->sex << " " << pos->life << "\n";
  }
  cout << "\n";
 
  person3->life = -1; // 
  cout << person3->age << " " << person3->sex << " " << person3->life << "\n"; 
  cout << "\n";
 
#if 1
  cout << "step3" << "\n";
  //list<PERSON>::iterator pos;
  for(pos = person_list.begin(); pos!=person_list.end(); ++pos){
	if (pos->age == 101){
	  pos->life = -1;
	  pos->func();
	}
  }
#endif
 
  cout << "step4" << "\n";
  // list<PERSON>::iterator pos;
  for(pos = person_list.begin(); pos!=person_list.end(); ++pos){
	cout << pos->age << " " << pos->sex << " " << pos->life << "\n";
  }
  cout << "\n";


#if 1 
 
  cout << "step5" << "\n";
  for ( pos = person_list.begin(); pos != person_list.end(); ){ //<-「it++」を削除
	if( pos->life == -1 ) {
      pos = person_list.erase( pos );
      continue;
	}
	pos++;  // ここで次のイテレートに
  }  
#endif
 
  cout << "step6" << "\n";
  //list<PERSON>::iterator pos;
  for(pos = person_list.begin(); pos!=person_list.end(); ++pos){
	cout << pos->age << " " << pos->sex << " " << pos->life << "\n";
  }
 
 
  return(0);
}
syntax2html

2019-02-22 STLのイテレータのメソッドへの飛し方 [長年日記]

/*
  g++ -g stl_test3.cpp -o stl_test3 -static-libstdc++ 
*/
 
#include <iostream>
#include <list>   // list 利用のため
using namespace std;
 
class PERSON
{
public:
  int age;
  int sex;
  int life; 
 
  PERSON(int _age, int _sex)
  {
	age = _age;
	sex = _sex;
	life = 1;
  }
 
  void func(void){
	age += 1;
  }
};
 
int sub_func(list<PERSON>::iterator pos)
{
  cout << pos->age << " " << pos->sex << " " << pos->life << "\n";  
  return 0;
}
 
int main(){
 
  list<PERSON> person_list;
  
  PERSON *person1 = new PERSON(18, 0);
  PERSON *person2 = new PERSON(23, 1);
  PERSON *person3 = new PERSON(101, 1);
  PERSON *person4 = new PERSON(1, 1);
 
  person_list.push_back(*person1);
  person_list.push_back(*person2);
  person_list.push_back(*person3);
  person_list.push_back(*person4);
 
 
  cout << "step2" << "\n";
  list<PERSON>::iterator pos;
  for(pos = person_list.begin(); pos!=person_list.end(); ++pos){
	cout << pos->age << " " << pos->sex << " " << pos->life << "\n";
	sub_func(pos);
  }
 
  return(0);
}
syntax2html

2019-02-25 note: forward declaration of [長年日記]

/*
  以下のエラーが取れずに、エライ目にあっていたので、メモ
 
  In member function 'int BUS::driver()':
error: invalid use of incomplete type 'class PERSON'
if (bp->status == 3){ // 3:乗車中
^~
note: forward declaration of 'class PERSON'
*/
 
#include <iostream>
#include <list>   // list 利用のため
using namespace std;
 
class PERSON; // PERSONの定義はBUSの下にある(いわゆる前置定義)
list<PERSON> person_list; 
 
class BUS
{
public:
  int a;
  list<PERSON> passenger;  
 
  BUS();
  int func();
};
 
BUS::BUS()
{
  a = 5;
}
 
int BUS:func()
{
  return 0;
}
 
class PERSON
{
public:
  int direction;
  PERSON();
};
 
PERSON::PERSON()
{
  
}
 
// これを以下のようにしたら、エラーが取れた
// 簡単に言えば、classの定義の後にメソッドを書くこと
 
 
#include <iostream>
#include <list>   // list 利用のため
using namespace std;
 
class PERSON; // PERSONの定義はBUSの下にある(いわゆる前置定義)
list<PERSON> person_list; 
 
class BUS
{
public:
  int a;
  list<PERSON> passenger;  
 
  BUS();
  int func();
};
 
class PERSON
{
public:
  int direction;
  PERSON();
};
 
 
BUS::BUS()
{
  a = 5;
}
 
int BUS:func()
{
  return 0;
}
 
 
PERSON::PERSON()
{
  
}
syntax2html

2019-02-27 test描画 [長年日記]